Page 4

Wide Field Astrophotography Using a Star Tracker
This article is about taking wide field photos of the night sky with a DSLR, a wide angled lens, and a tripod without and with a tracking mount. Wide field images, often of the Milky Way with an interesting foreground subject, can be very attractive and obtained with equipment you may already have. They are best taken from a dark location. The images will need processing in Photoshop CC or similar software.
Equipment
Let's start with the required equipment. You will need a tripod, a DSLR and an appropriate lens. A telephoto lens with a 200mm focal length has a field of view of about 10.3 degrees on a full framed DSLR and 6.7 degrees on a crop sensor DSLR. A 15mm photographic lens has a field of view of 137 degrees on a full frame DSLR. The field of view for a given image is selected based on the size of the subject in the to be photographed and the available lenses. I use a lens in the 14mm to 24mm range to photography the Milky Way. A fast lens is a lens with a focal ration of f/2.8 or less. A fast lens has a larger aperture and admits more light. Wide field photos taken with a fast lens allow a shorter exposure than one made with a higher focal ratio lens. For example, an image made with a f/5.6 lens will require four times the exposure time as one made with a f/2.8 lens. A 30 second exposure at f/2.8 becomes a two minute exposure at f/5.6. Exposure time is determined by the brightness of the subject, the focal length and focal ratio of the lens, the highest ISO that will not produce excess noise, and how long an exposure can be made before developing star trails.
Exposure Time
For photos taken with a DSLR on a tripod the longest exposure time (T) before developing star trails can be estimated by T=400/(lens focal length in mm). For a 15mm lens T=400/15 or about 26 seconds. For example, to a obtain a wide field view of the Milky Way the exposure may need to be longer than 26 seconds from the above example to get a usable image. In this case a star tracker can be inserted between the tripod and camera. A star tracker is a mechanical device that rotates the imaging package with the earth's rotation during a long exposure and thus prevents the formation of star trails. It requires visual polar alignment. Exposure durations of up to four times the exposure obtained without the tracker are easily achieved with a star tracker. For the 15mm lens an exposure of about 100 to 120 seconds becomes possible.
Trackers
A star tracker can be a DIY project made from wood, a spring driven mechanical tracker, a powered tracker with or without a polar scope, or a computerized telescope mount. The powered and unpowered trackers are much more portable than a telescope mount. Two trackers will be described here. Both require a tripod, a wedge or ball head for attaching the tracker to the tripod, and a small ball head on top of the tracker for attaching the camera
The Omegon Minitrack LX2 (Figure 1) is a wind up, spring driven tracker capable of handling a 4.4 pound load. No electrical power is required. It ticks like a clock when active. It weighs 1.66 pounds and has a sight tube for polar alignment. It will track up to 60 minutes with one winding of the spring. There is now an LX3 model available with a 6.6 pound capacity and an optical polar alignment scope. It weighs 2.9 pounds. The LX2 requires some effort to polar align but works well within the weight limit. It takes up only a small space in a suitcase or bag. Figure 2 is a photo of the Milky Way taken with this tracker in Yellowstone National Park where the sky was very dark. It was made with a Nikon D810A, 20mm f/1.8 lens at f/2, ISO 1600, and a 37 second exposure.
The Sky-Watcher Star Adventurer (Figure 3) is a powered tracker that can support an 11 pound payload and has a counterweight. It can be powered with batteries or an external power module. It weighs 2.2 pounds. The Pro model comes with a wedge base and illuminated polar scope. I use this tracker with a ball head with micro adjusters rather than the wedge base. A digital level is also helpful for both leveling the ball head and setting the latitude angle. Polar alignment is achieved using a phone application to determine where to place Polaris on the reticle of the polar scope. I power this tracker with removable batteries or an external battery eliminator. It is easy to use but bulkier to pack for travel than the Omegon Minitrack. Figure 4 is a recent photo of the Milky Way taken with the Star Adventurer at home in our backyard. It was made with a Nikon D810A, 15mm f/2.3 lens at f/3.2, ISO 200, and a 60 second exposure.
A star tracker is a very useful, affordable accessory for taking longer wide field astrophotography exposures without star trails with a DSLR and a camera lens. There are trackers for most budgets. They travel well and can even be put in a backpack for hiking to a photographic site. Bulkier telescope mounts can remain at home.
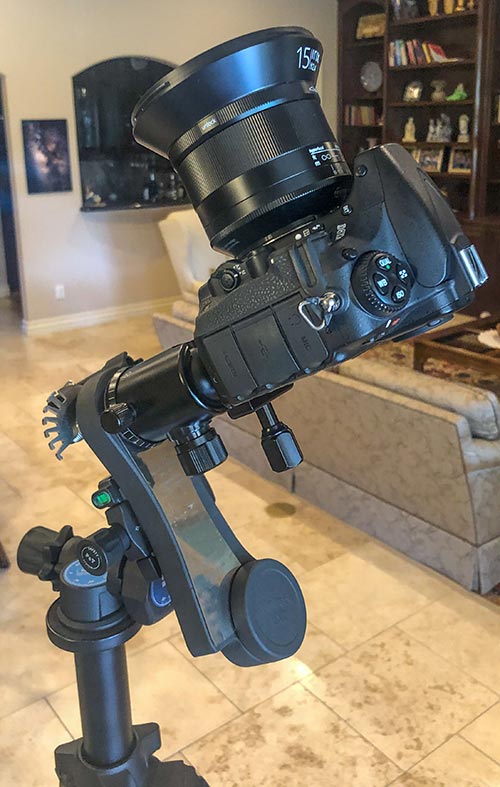
Figure 1

Figure 2
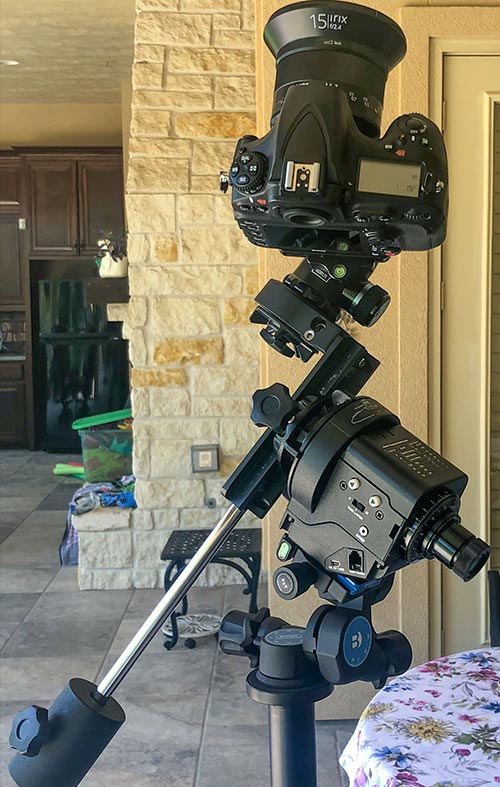
Figure 3

Figure 4

It's All About the Light
Randall Light, M.D.
Website: R L Photography
Contact: randylight@gmail.com