Page 3

Astrophotography - It's All About the Light
By Randall Light, MD
This is the first in a series of articles about astrophotography for the Brazos Valley Astronomy Club (BVAC). Astrophotography is creating images of astronomical subjects in the day or night sky.
All images and astronomical observing are about seeing and capturing the light. The subject, the weather, and night sky conditions control the quality and character of the light. The equipment chosen and how it is used to make an image controls how the light is recorded and the quality of the resulting image. This is an initial article on how to make astrophotography images with a digital single lens reflex (DSLR) camera.
Types of Astrophotography
There are a number of common types of astrophotography images. These include photographing nightscapes, star trails, comets, meteors, asteroids, the aurora borealis, the sun, the moon, planets, deep sky objects, and asterisms. The light produced by the subject determines how a quality image will be captured.
Randall Light, MD
Astrophotographer
Because of advances in technology, digital cameras are now the standard for recording the light. Although phone cameras and pocket cameras can be used to capture projected images, the focus of this series of articles will be on capturing images with a DSLR which you may already own. These cameras usually come with a basic lens and are available at a range of prices. They can often be acquired economically used. A variety of lenses for astrophotography can be added based on need and interest.
Both full frame and crop sensor DSLRs can be used for astrophotography. The size of the sensor as well as the lens or telescope determine the field of view recorded. Both zoom and fixed focal length (prime) lenses can be used for astrophotography. Prime lenses can often be set to admit more photons than a zoom lens. A tripod is frequently used for stability. This series of articles will progress from using whatever equipment you already own to imaging with a dedicated astrophotography camera and a camera lens or telescope on a telescope mount. We will progress to using a secondary guide camera and scope for improved tracking.
Astrophotography Considerations
When the goal is to capture an excellent image, the most important factors to consider are weather, location, darkness, transparency and seeing. (Please see Don Carona's article in the BVAC Winter 2018 Newsletter Observing
Astronomical Seeing and Transparency. Monitoring weather and observing forecasts such as Wunderground, ClearDarkSky, SkippySky, and sites listed in Don's article can improve the chances of imaging under desirable conditions.
Focusing
Focusing the camera lens or telescope is important and may be challenging. Sharp images are highly desirable. Focusing a camera lens for astrophotography at night can be done in several ways. To start, the lens can be autofocused or manually focused before dark on a distant object. Autofocus is then turned off. The focus point is noted or recorded, and the focus ring can be taped into position if desired. When the moon is present, it provides an easy target for focusing in the dark. Alternately, when the moon is not present, manually focusing on stars is facilitated by using the live view mode of the camera. This mode can display a magnified view of what the camera is seeing through the lens. Ultimately, advanced focusing of cameras and telescopes can be achieved with software analysis and computerized focusing control.
Shutter Speed
With the exception of solar and lunar photography, most astrophotography images are recorded under low lighting conditions. This means learning to use the manual controls on the camera in the dark.
Many DSLRs will allow exposures of up to 30 seconds. After that, one has to use bulb mode (B) and a cable release or intervalometer for longer exposures. If star trails are desired, exposures can be several minutes long. If star trails are to be avoided while using a tripod, the duration of the exposure will be much shorter.
F-stop
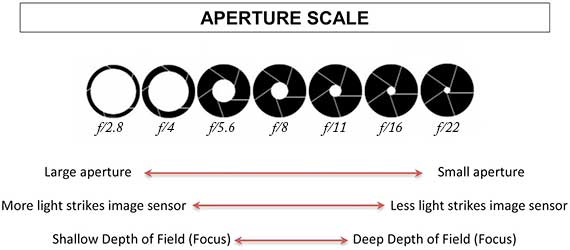
The f/stop determines the size of the opening admitting light to the camera. It also determines the depth of field (the depth of the area of focus). The depth of field is more important for nightscape photography than photographing deep sky objects where everything is at infinity. There is greater depth of field with high numbered f/stops. Lower numbered f/stops have larger openings than higher numbered f/stops. Increasing f/stops admit half as much light as the previous one. The usual sequence of f/stops is illustrated in Figure 1. Lenses are labeled with the largest aperture they offer. A setting of f/2.8 provides a larger opening and lets in more light than an f/8 setting.
Unlike a camera lens that can be set to a variety of apertures, a telescope has a fixed aperture and focal ratio defined by the physical dimensions of the optics. The telescope's focal length divided by the diameter of the objective is the focal ratio. The telescope's focal ratio corresponds to the f/stop of a camera lens. For example, a 10 inch (d=254 mm) telescope with a focal length of fl=2000 mm has a focal ratio f=fl /d or f=2000/254 or about f/8. Low light exposures done with a camera lens require a wide open aperture to capture the most photos. If this produces some irregularity in the shape of stars, stopping down one f/stop may produce a more pinpoint star at the expense of increasing the exposure time.
ISO
ISO is said to set the sensitivity of the camera sensor. Thus, this setting is often explained as setting the sensor gain. In reality, the sensor gain is fixed, and the ISO is the multiplier applied to the sensor data to increase the brightness of the digital image.
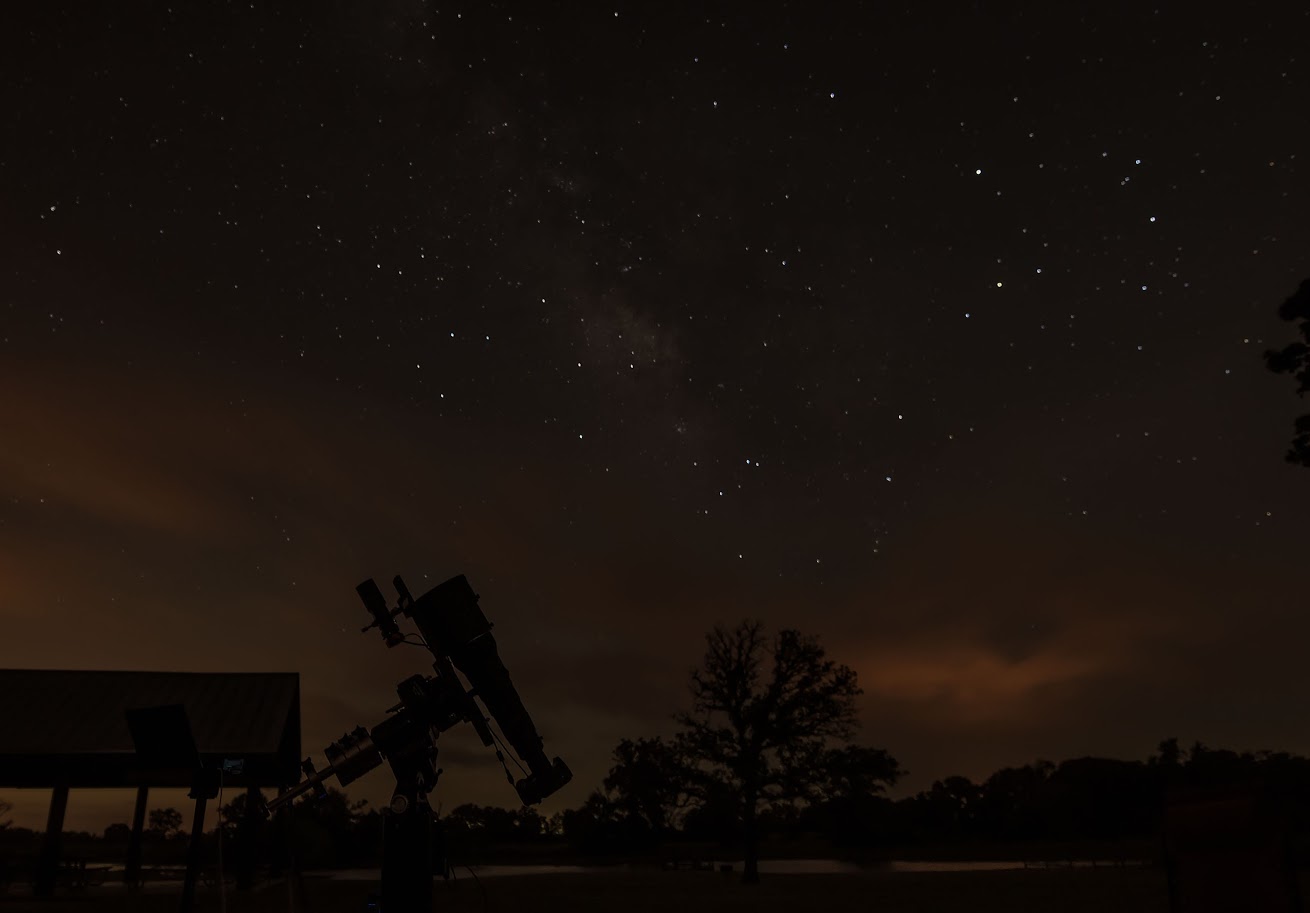
High ISOs result in increased noise in the image. This noise is most noticeable in the dark areas as graininess. Like f/stops the difference between ISO settings is twice the brightness of the adjacent setting. A typical sequence of setting is ISO 50, 100, 200, 400, 800, 1600, 3200, etc. The ISO setting for acceptable noise has to be determined for each camera by looking at the same image taken at each ISO setting. Figure 2 was a 30 second image at ISO 25600 used only for composition. Note the graininess of the image. Figure 3 is a 480 second image at ISO 1600. Note the marked reduction in noise.

Figure 2
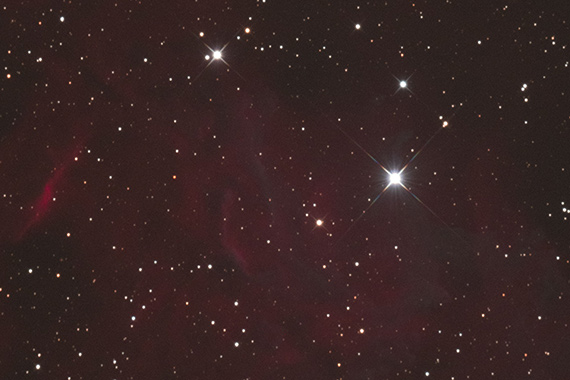
Figure 3
White Balance
White balance determines how colors are rendered in an image. Typical settings are Auto, Daylight, Bright Sun, Shade, Overcast, etc. For most astrophotography images recorded at night, a daylight setting gives the most accurate results. Some cameras provide custom white balance settings. These are most useful if a specialized filter such a light pollution filter is used. A custom setting removes the color cast caused by the filter.
File Types
Finally, the type of image file the camera records must be considered. The usual choice is jpg or raw image files.
They contain much more detail especially in the dark areas. This detail can be brought out in post processing using the image processing program of your choice. That said, don't hesitate to start by taking unedited jpg images as a starting point. All astrophotography images can be improved by using a photo editor to adjust exposure, contrast, saturation, and sharpness as well as reducing noise. Camera settings for long exposure noise reduction and high ISO noise reduction are usually turned off. When they are turned on, they double the total exposure time.
Photographing the Moon
Now let's look at two types of astrophotography images and how they are made. First, the moon is a good starting point. As always high transparency and low seeing are desirable. Although the moon may be best seen at night, the light we see from the moon is actually reflected sunlight. Therefore, daylight camera settings are required to photograph the moon. Automatic camera settings will result in a badly overexposed moon.
With a DSLR and a lens that will zoom to 200 mm or more, the camera may autofocus on the moon or the edge of the moon. If not, focus with live view. Typical lunar manual exposure settings are 1/250 sec, f/8, ISO 200, and daylight white balance. If you have a cable release, now is the time to use it. Otherwise, use the camera's timer to release the shutter.
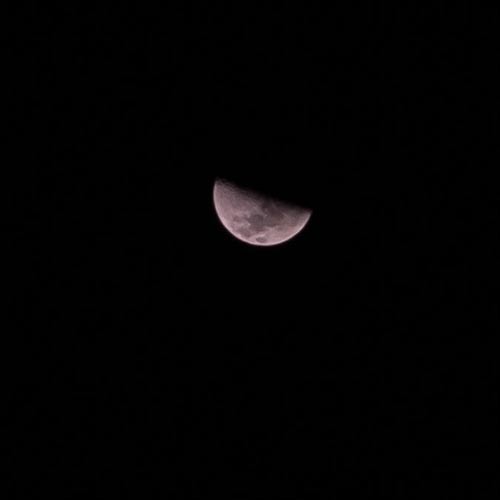
Figure 4
Take an image and look at it on the display on the back of the camera. If it is too dark, increase the exposure by letting in more light at f/5.6. If it is too bright, move to f/11. If you run out of f/stops to adjust, adjust the shutter speed one step at a time as necessary to get an image with some lunar detail and contrast. The image in Figure 4 was made with a DSLR and a lens at 200 mm set to 1/250, f/8, ISO 200, and daylight white balance.
Nightscapes
Next, let's consider nightscapes. Here high transparency is more important than low seeing. The field of view is wide enough that seeing doesn't have as much impact on the size of the stars. My first nightscape was a picture of the Milky Way over the Chisos Mountains in Big Bend National Park on a dark night. I didn't know about transparency, seeing, or star trails then. It was taken with a DSLR camera and a 14 mm lens at f/2.8, a 30 second exposure, ISO 3200, and daylight white balance. The result is shown in Figure 5. The Milky Way is prominent in the dark sky and the Mountains provide interesting context and scale. I was happy with my first effort.
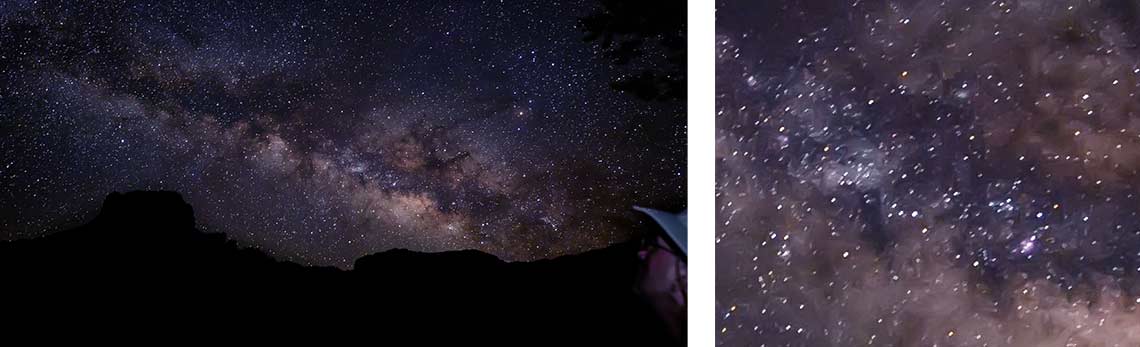
Figure 5
Figure 6
However, Figure 6 shows a small area of the image magnified. Notice that the stars are not pinpoint but are short lines. The exposure of this image is long enough to produce star trails. There is an old rule of thumb for this situation that says in order to minimize star trail formation use a shutter speed, S, that does not exceed 500 divided by the focal length, fl, of the lens.
S < 500/fl. Thus, for my image S < 500/14 = 35 seconds. Clearly, the guideline is flawed. I have found from experience that
S < 400/fl is better but still produces some star trailing. In this instance, S <= 400/14 = 28.5 second. Figure 7 shows a more recent nightscape of the Regina Caelorum Observatory with the Milky Way in the background. This image was made with a DSLR and a 20 mm lens at f/1.8, 20 seconds, ISO 1600 and daylight white balance with minimal star trailing. Thus,
S < 400/20 = 20 sec.
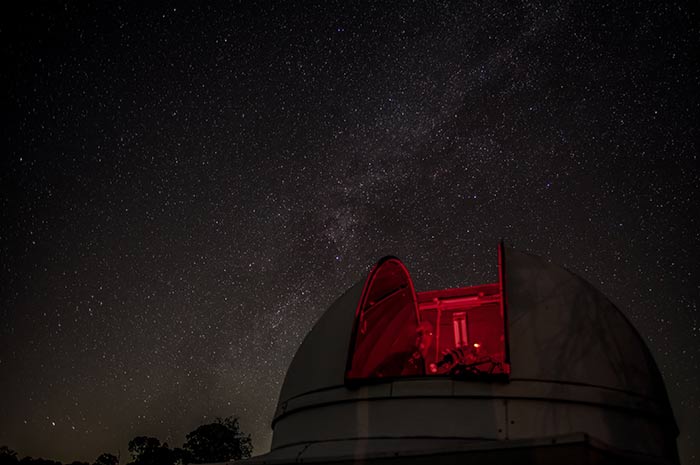
Figure 7
Summary
In summary, lunar and nightscape astrophotography images can be made with a DSLR camera and lens using manual settings to achieve a desirable exposure while minimizing noise and star trails. Dark locations and high transparency are highly desirable. Now, go out and capture the light. Try taking some lunar and nightscape images with the gear you have. If you don't have a tripod use a table or any solid object. Turn up the ISO, use the widest f/stop the lens has, and use as slow a shutter speed as necessary to get an image. Don't worry if it isn't perfect the first time. Get some experience and share your images.
Author: Randall Light, M.D.
randylightmd@yahoo.com
www.randalllight.com
